PHOTOGRAPHY EDUCATION · PORTRAIT TECHNIQUE
How to Get a Blurry Background (Bokeh) in Your Portraits
South Shore Photography, based in Rockland, MA, serves portrait clients across Hingham, Scituate, Norwell, Duxbury, Marshfield, Cohasset, Hanover, Weymouth, and Plymouth. Photographer Chris McCarthy has shot thousands of portrait sessions across the South Shore — and the single most common question he gets from clients and aspiring photographers alike is: “how do you get that beautiful blurry background?” Most beginners think the answer is a fast lens. It's more complicated than that, and this post explains exactly what's going on.
The blurry background question is one I genuinely love getting because the real answer surprises almost everyone. Most people assume it's all about aperture — buy an f/1.4 lens, open it all the way up, and the background melts away. And then they do exactly that, and their first images come back soft and muddy, with the wrong thing in focus, and they're baffled. Here's what I've learned from shooting hundreds of portrait sessions at spots like World's End in Hingham, the North River corridor in Norwell, Duxbury Beach, and Scituate Harbor: bokeh is a four-variable equation, and aperture is the least interesting variable once you understand the others. This post is going to break all four down in plain language, rank them by actual impact, and give you the real-world techniques I use on every session to get that creamy background separation that clients love.
What Bokeh Actually Is (and Isn't)
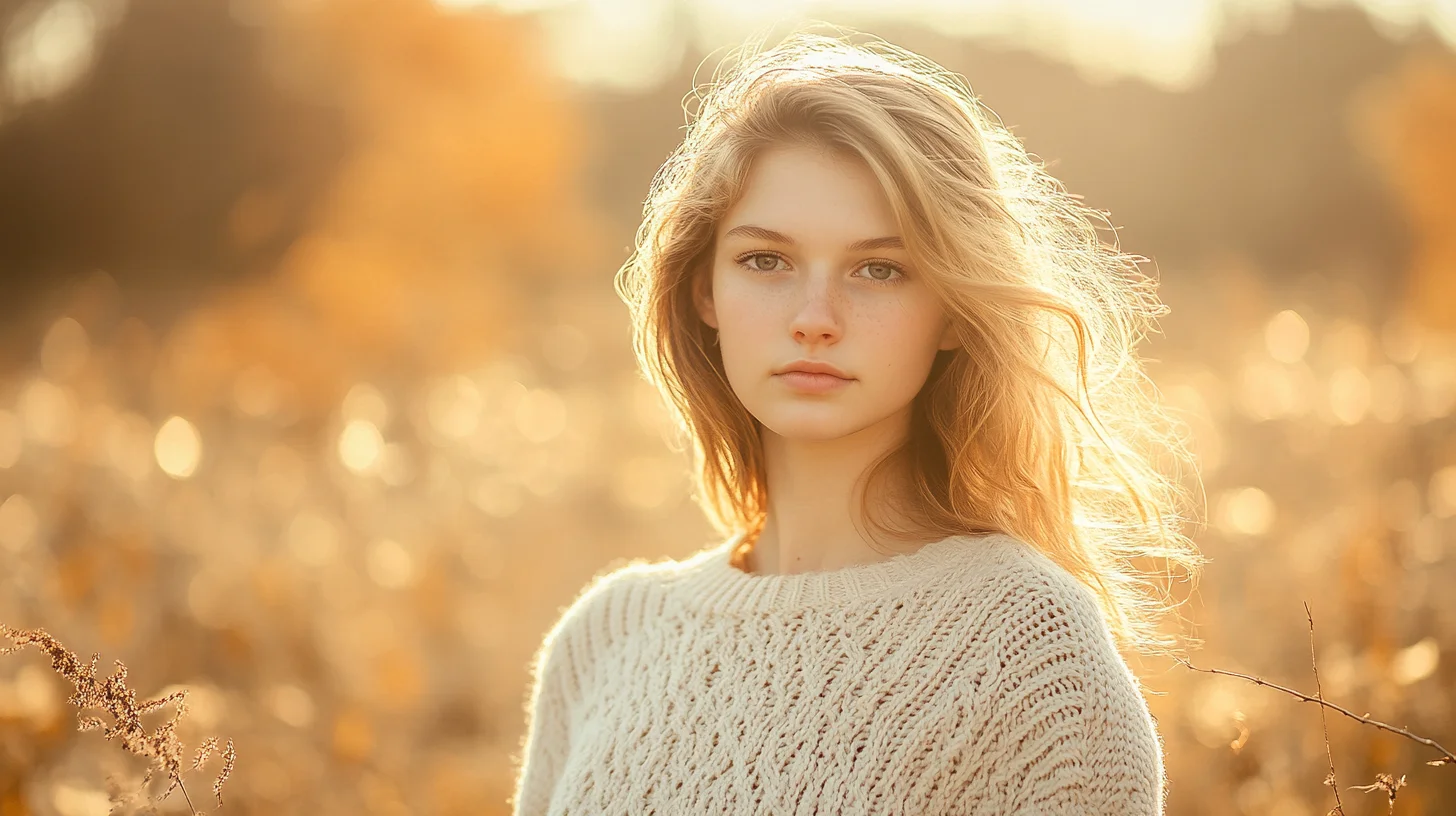
“Bokeh” comes from a Japanese word meaning blur or haze, and in photography it refers specifically to the quality of the out-of-focus areas in an image — not just whether things are blurry, but how the blur looks. Good bokeh means background highlights render as smooth, round circles. Background colors transition softly without harsh edges. The overall out-of-focus region feels creamy and three-dimensional rather than choppy and distracting.
This distinction matters because “more bokeh” isn't actually a thing. What you probably want when you ask for it is two separate things: more background separation (meaning a shallower depth of field, so the background is more out of focus) and pleasing bokeh quality (meaning the blur looks smooth and beautiful rather than harsh and busy). Background separation is controlled by the four variables I'll cover in a moment. Bokeh quality is largely a function of the specific lens — its optical design, the number of aperture blades, and the way it renders out-of-focus highlights.
I mention this because it explains why two photographers can shoot the same scene at the same settings and get wildly different results. A budget 50mm f/1.8 might give you shallow depth of field but render the background with busy, overlapping circles and harsh edges. A well-designed 85mm f/1.4 at the same aperture produces butter-smooth circles with graceful transitions. Same amount of blur, very different quality. When clients respond to professional portraits and say “I love that blurry background,” they're usually responding to both separation and quality simultaneously — and only one of those is free.
The 4 Factors That Control Background Blur (Ranked by Impact)
Here they are in order of actual, real-world effect on background separation. The ranking surprises most beginners.
1. Subject-to-background distance. This is the single biggest lever, and it costs nothing to use. The farther your subject is from the background, the more out of focus that background becomes — at any aperture, with any lens. Move your subject ten feet forward, and the background gets dramatically blurrier. Nothing else has this kind of impact for free.
2. Lens focal length. Longer focal lengths compress the background and produce more blur at any equivalent subject framing. An 85mm lens produces more background blur than a 35mm lens when both are used to fill the frame with the same subject. This is a significant effect and one many beginners underestimate.
3. Aperture (f-stop). Yes, wider aperture (lower f-number) gives you more background blur. But it's ranked third here intentionally — its impact is real but often overstated, and it comes with significant trade-offs around depth of field that the top two variables don't.
4. Sensor size. Larger sensors produce shallower depth of field at equivalent settings than smaller sensors. Full-frame cameras outperform crop-sensor cameras, which outperform phones. This matters when comparing systems, but within a given system it's a fixed variable — you can't change it on a shoot.
Subject-to-Background Distance: The Free Bokeh Hack
I want to spend extra time here because this is the variable that moves the needle most dramatically and that most beginners completely ignore. When you're setting up a portrait, before you touch a single camera setting, ask yourself: how far is my subject from the background? If the answer is less than ten feet, you're leaving your best blur tool on the table.
Here's a concrete example from a senior portrait session I shot at World's End in Hingham last fall. We started at the entrance to the main carriage path where the subject was standing about five feet in front of the tree line. I was shooting 85mm at f/2.8 — good settings by any measure. The background was blurry, but you could clearly identify individual tree trunks, specific branches, patches of sky. Nice enough, but not what the image called for.
I moved her forward fifteen feet to a spot where the trees were much farther behind her. Same lens, same f/2.8, same focal length. The background transformed — the tree line became an indistinct wash of warm gold and amber, completely unrecognizable as specific trees. The subject popped off the frame in a way that the earlier framing simply hadn't achieved. That fifteen-foot move did more for the image than any aperture change could have. And it was free.
On every session — whether I'm at Norris Reservation in Norwell, the Marshfield conservation fields, or Nantasket Beach in Hull — I'm constantly scanning for setups where I can put real distance between my subject and whatever is behind them. Open meadows with tree lines at a distance are ideal. Long paths where the background recedes naturally work beautifully. Even beach shots where the ocean becomes the background benefit from this thinking — stepping the subject forward away from a crowd or a structure makes a meaningful difference.
Lens Focal Length: Why 85mm Beats 35mm for Portraits
Focal length affects background blur in two related ways: longer lenses have a shallower depth of field at equivalent apertures, and they compress the apparent distance between the subject and background — making the background appear larger and softer in the frame. Both effects work in your favor when you want that creamy portrait look.
The practical comparison: an 85mm lens at f/2.8, framed to show a head-and-shoulders portrait, produces significantly more background blur than a 35mm lens at f/2.8 framed to show the same head-and-shoulders composition — even though the subject appears identical in both frames. The 85mm is physically farther from the subject, which increases the subject-to-background distance from the camera's perspective, which increases blur. The effect is real and visible, not subtle.
The “classic portrait look” — that slightly compressed, three-dimensional quality where the subject pops off a soft background — is partly a focal length effect. It's why portrait photographers have defaulted to 85mm through 135mm for decades. The 85mm specifically has a near-perfect combination of background compression, subject flattery (no wide-angle distortion on faces), and working distance (you're not uncomfortably close to your subject).
For anyone on a budget looking to get the most background blur per dollar: an 85mm f/1.8 (available used for around $400 for any major brand) will outperform a 35mm f/1.4 (often $1,500 or more) for portrait background separation every time. Longer focal length compensates for smaller maximum aperture in ways that matter for this specific application. I tell every aspiring portrait photographer the same thing: if you own a kit zoom and want to start getting serious blur, rent or buy an 85mm before you consider a faster wide lens.
Aperture (the f-stop): What Most Beginners Get Wrong
Yes, wider aperture (lower f-number) means more background blur. The physics is straightforward — a larger opening collects light from a broader cone, which means anything outside the precise focal plane is rendered more out of focus. At f/1.4, the depth of field at portrait distances can be less than an inch. At f/8, you could focus on someone's nose and have everything from their chin to the trees behind them in sharp focus.
Here's what most beginners get wrong: f/1.4 is not a default portrait aperture — it's a tool for specific situations. At f/1.4, the depth of field is so thin that if you focus on a person's near eye, their far eye may be noticeably soft. On a couple facing the camera side by side, one face will be sharper than the other. Slight camera movement, slight subject movement — either one can shift what's actually in the focal plane. The images look dreamy until you zoom in and realize the focus is slightly off, and then they just look soft.
My real working range: f/2.8 to f/4 for about 90% of portrait work. At f/2.8, I get dramatic background blur with enough depth of field to keep both eyes sharp on a single subject and both faces sharp on a couple at moderate distances. At f/4, I get clean separation while keeping larger family groups in focus. f/1.4 comes out for very specific creative shots — a single subject in controlled light where I want maximum drama and I'm being careful with my focus point. It's not a fire-and-forget setting.
The other thing to understand: there are diminishing returns as you go wider. The jump from f/5.6 to f/2.8 is enormous. The jump from f/2.8 to f/1.4 is noticeable but much smaller in real-world portraits. You're making your life harder with shallower depth of field to chase a marginal increase in blur. Unless you have a compelling creative reason, f/2.8 is usually the right call.
Sensor Size and Why Phones Can't Match Real Cameras (Mostly)
Physics is the reason. A larger sensor captures a larger image circle, which means at any given field of view, a larger sensor is using a longer focal length than a smaller sensor — and longer focal length means more background blur. Full-frame cameras produce shallower depth of field than APS-C (crop) cameras, which produce shallower depth of field than Micro Four Thirds cameras, which produce shallower depth of field than phone sensors.
Phone sensors are tiny — often smaller than a fingernail. To produce any background blur at all optically, a phone would need to shoot at effective apertures so extreme they're practically impossible to manufacture in a thin device. So phones fake it. Portrait Mode on phones is software-generated bokeh — computational photography that attempts to identify the subject, separate it from the background, and apply an artificial blur to the background layer. Modern versions are genuinely impressive at portrait distances with a clear subject.
The tells: hair is the most common failure point, especially flyaways and loose strands that cross the background boundary. Glasses frames where the lens is transparent. Anything fine-grained at the edges of the subject — the software struggles to determine what's subject and what's background. For social-media-sized images viewed on a phone screen, these artifacts are often invisible. For anything larger — wall prints, even 8x10 prints on a desk — the difference between real optical bokeh and Portrait Mode is usually apparent. I won't pretend it never matters. For clients who want prints, it always matters.
My Lens Setup for Maximum Bokeh on Portrait Sessions
I'll be honest about what I actually use rather than what's theoretically optimal. My most-used portrait lens is the Sony 85mm f/1.4 GM — it's the lens that lives on my camera for the majority of a portrait session. The bokeh quality on that lens is genuinely exceptional in a way that goes beyond what the specs suggest. The out-of-focus highlights render as near-perfect circles with smooth transitions, and there's a three-dimensional quality to the images that I haven't replicated with anything cheaper. It's expensive, and I don't recommend it to beginners, but it earns its cost on every session.
For the most aggressive background separation — particularly in environmental portraits where I want the subject to pop dramatically from a recognizable but completely blurry landscape — I reach for the 70-200mm f/2.8 at the 200mm end. At 200mm, the background compression is extraordinary. I've shot couples at Scituate Harbor at 200mm f/2.8 where the harbor boats behind them became indistinct colored shapes — the subjects floated in an impressionistic wash of blues and grays. Nothing else in my kit produces that level of separation.
For full-length shots, couples portraits, and environmental images where I want some background context, I use the 35mm f/1.4 GM. At f/2.8, it doesn't deliver the same blur as the 85mm, but it's the right tool for showing the person in relationship to their environment — the carriage path at World's End, the marsh at low tide, a rocky beach at Cohasset. The 35mm at f/2.8 with the subject twenty feet from the background still delivers clean separation with a sense of place.
The honest budget recommendation: none of that gear is required to produce great portrait bokeh. An 85mm f/1.8 — any brand, any generation, available used for $300-$400 — produces roughly 80% of the look of premium glass at a fraction of the price. If you're just starting out and want to understand what professional portrait backgrounds look like before committing to expensive lenses, that's the lens to start with.
A Real Example: Engagement Portraits at World's End, Hingham
Let me walk through a specific session to show how all four variables interact in the real world. I photographed an engagement session at World's End last October — peak foliage, early afternoon light, a couple who wanted “that editorial blurry background” they'd seen in magazine spreads. We started at the main carriage path entrance where a big maple archway creates a natural frame.
First position: couple standing about five feet from the tree line, 85mm at f/2.8. The images looked nice — trees recognizably blurry, couple sharp. But the background still had enough detail that it was competing for attention. I could identify individual trunks, specific branches. It wasn't wrong, but it wasn't what they were asking for.
I moved them forward twenty feet to the open section of the carriage path where the tree line receded into the distance. Same 85mm, same f/2.8 — nothing changed on the camera. The background became a wash of gold and amber — the October foliage rendered as completely unrecognizable, beautiful color rather than identifiable trees. The couple popped off the frame in exactly the way they'd described wanting. The twenty-foot move did more for the image than going from f/2.8 to f/1.4 would have.
We finished the session by moving to the hilltop where I could use the 70-200mm at 200mm with Hingham Bay visible behind them in the far distance. At that focal length and distance, the water and the far shore became abstract bands of blue and silver. It was the most dramatic separation of the session — and it came from the combination of a long focal length and maximum subject-to-background distance, not from an extreme aperture setting.
Frequently Asked Questions
What aperture do I need for blurry background bokeh?
f/2.8 is the working photographer's sweet spot for portraits — significant background blur with safe depth of field. f/1.8 and f/1.4 produce more dramatic blur but with razor-thin depth of field (one eye sharp, the other soft). f/4 still gives clear background separation while keeping multiple subjects in focus. Aperture matters less than subject-to-background distance.
What is bokeh and how do I get it?
Bokeh is the quality of the out-of-focus areas in a photo — specifically how smooth and pleasing the blur looks. To get good bokeh: use a longer focal length (85mm or longer for portraits), a wide aperture (f/2.8 or wider), and most importantly, move your subject far away from the background. That last one is the biggest free lever you have.
What is the cheapest way to get blurry backgrounds?
Buy an 85mm f/1.8 prime lens — around $400 used for any major brand — and shoot at f/2.8 with your subject standing 15 or more feet from the background. That setup produces magazine-quality background separation for a fraction of the cost of premium glass. The 50mm f/1.8 (“nifty fifty”) is the budget alternative at under $150 — smaller blur effect, but still clearly better than a kit zoom.
Can I get good bokeh with a phone?
Modern phones simulate bokeh in software (Portrait Mode), and recent versions are genuinely impressive at straightforward portrait distances. The giveaway is usually the edges around hair, glasses, or anything fine-grained — the software struggles to separate subject from background cleanly in those areas. For social-media-sized images, phone bokeh is often good enough. For prints or anything larger than a screen, real optical bokeh from a dedicated camera still wins clearly.
Is f/1.4 better than f/2.8 for portraits?
Not always — and often not. At f/1.4, depth of field is so shallow that you have to be precise about which eye you focus on, and the far eye will often come back slightly soft. f/2.8 gives you dramatic background blur with enough depth of field to keep both eyes sharp on a single subject and both faces sharp on a couple. I shoot f/2.8 to f/4 for 90% of my professional portrait work. f/1.4 is a tool for specific creative moments, not a default setting.
PRO TIP
“Before adjusting any setting on your camera, ask yourself: can I move the subject farther from the background? Distance is free, takes 10 seconds, and produces more blur than any aperture change.”
Want Magazine-Quality Bokeh in Your Own Portraits?
Every session is shot on professional fast prime lenses with the kind of background separation that turns ordinary settings into something cinematic.

ABOUT THE AUTHOR
Chris McCarthy is a portrait photographer based in Rockland, MA who has been photographing the South Shore full-time since opening his studio in 2014 — more than a decade of outdoor and lifestyle portrait work across the region. He specializes in headshots, senior portraits, branding, family, and maternity photography — shooting at his studio at 83 E Water Street and on-location throughout southeastern Massachusetts at places like World's End, Scituate Harbor, Duxbury Beach, and the North River conservation land in Norwell.
More from the Blog
SERVICE
Family Portraits — South Shore
Where shallow depth of field shines — outdoor family sessions →
SERVICE
Maternity Photography — South Shore
Soft bokeh + golden light for outdoor maternity portraits →
PILLAR GUIDE
The Complete Photography Basics Guide
Where aperture and depth of field fit alongside ISO, shutter speed, and the rest of the camera fundamentals.
BEGINNER GUIDE
The Exposure Triangle Explained
How aperture fits into the broader exposure picture with ISO and shutter speed.
TROUBLESHOOTING
Why Aren't My Photos Sharp?
How razor-thin depth of field at f/1.4 causes most “soft” portrait photos.