PHOTOGRAPHY BASICS · COMPOSITION
Composition Fundamentals for Portrait Photography
South Shore Photography is an outdoor lifestyle portrait studio based in Rockland, MA, serving clients across Hingham, Scituate, Norwell, Duxbury, Marshfield, Cohasset, Hanover, Weymouth, Plymouth, and the surrounding South Shore. Photographer Chris McCarthy has composed portraits in the varied landscapes of coastal and inland Massachusetts for years — and in this post he breaks down the composition tools he reaches for in every session.
When people ask me what separates a good portrait from a great one, my first answer is almost never lighting, gear, or editing. Those things matter — but they're recoverable mistakes. If the exposure is off, I can fix it in post. If the composition is wrong, the photograph is wrong, and no amount of editing changes that. Composition is the decision about where to put the subject within the frame, how to relate the subject to the environment, and what you include or exclude on every side of the image. It's also the part of photography that beginners tend to learn last, after they've figured out how to get sharp focus and proper exposure. That's backwards. Composition is where I'd start if I were learning all over again — and it's what I want to walk through here, with specific examples from the South Shore locations I shoot in most.
The Rule of Thirds — and When to Ignore It
The rule of thirds is the most widely taught composition principle in photography, and for good reason — it works reliably across a huge range of situations. The concept is simple: mentally divide your frame into a 3×3 grid (most cameras and phones will display this overlay in the viewfinder or on the live view screen). The four intersections of those grid lines are the strongest focal points in the frame. Place your subject's eyes on the upper-third intersection points, and you've got a composition that feels balanced and intentional without feeling static.
In practice, when I'm shooting a portrait at Wollaston Beach in Quincy or along the Duxbury beach path, I'll position the subject off-center — eyes on the upper third line — and let the environment fill the rest of the frame. The shoreline runs diagonally, the horizon sits in the lower third, and the subject has visual weight without dominating the entire image. That relationship between subject and environment is what outdoor portrait photography is about. When the subject fills the entire frame, you lose the sense of place that makes South Shore portraits feel like South Shore portraits.
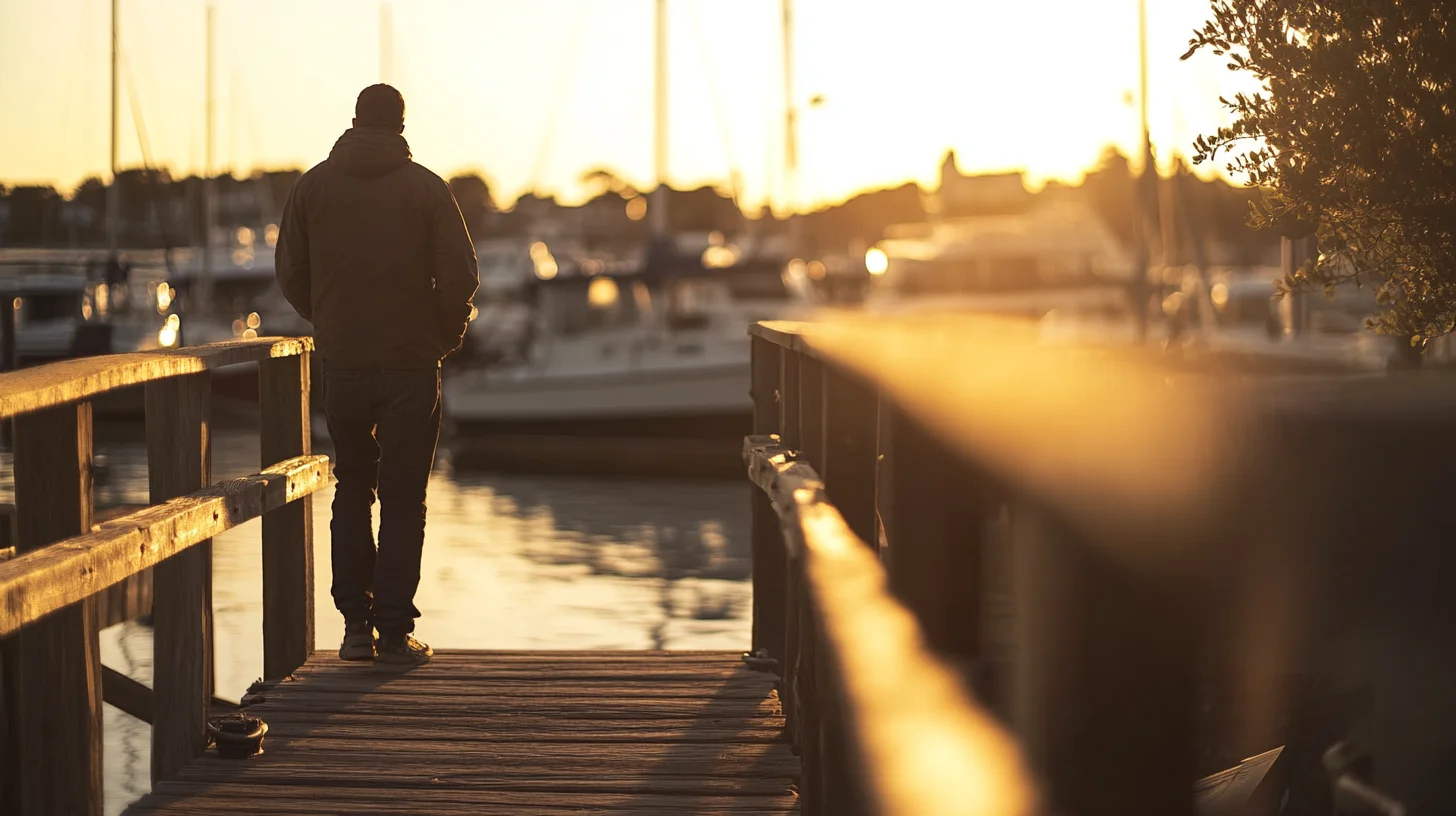
But here's the thing: centered compositions work too, and sometimes they work better. When a location has strong symmetry — a wooden dock running straight into the harbor, a path that narrows toward a vanishing point, a perfectly symmetrical archway — placing the subject dead center lets you lean into that geometry. A centered portrait reads as formal, deliberate, and authoritative. An off-center portrait reads as relaxed, exploratory, and environmental. Both are valid. The rule of thirds is a default that reliably produces good work; centered compositions are a deliberate choice that can produce exceptional work when the setting supports it.
My workflow: I almost always start with rule of thirds framing, then check whether the environment has the kind of symmetry that would reward centering. If it does, I'll shoot both and let the client see which feels right. Almost always, both are keepers. The goal is always intentionality — whatever framing you choose, choose it on purpose.
Leading Lines — Using the Environment to Direct the Eye
Leading lines are environmental lines that guide the viewer's eye through the frame toward the subject. They create depth, movement, and intentionality. They're everywhere in outdoor photography — and once you start seeing them, you can't unsee them.
The Wollaston Beach shoreline in Quincy is one of my favorite leading line locations on the South Shore. The waterline creates a natural diagonal from the lower corner of the frame upward toward the subject. If I position the person at the point where the shoreline recedes into the background, the viewer's eye naturally travels along the water's edge straight to the subject. No conscious effort required — the line does the work. The same principle applies to the wooden boardwalk at Hingham Harbor, which runs from the lower portion of the frame straight toward the water and whoever stands at the far end. The parallel planks converge in perspective, creating a powerful directional force that points directly at the subject.
Trails through conservation land work similarly. The carriage road through World's End in Hingham narrows in perspective as it runs into the distance, creating convergence lines that pull the eye toward wherever the subject stands on the path. A person walking along that trail who turns to look back at the camera gives you three compositional tools at once: leading lines from the path edges, negative space ahead of them, and a natural frame from the tree canopy overhead.
The critical distinction: a leading line moves the eye toward the subject, while a cluttering line competes with or bisects the subject. A fence line running from the corner of the frame toward the person leads. A fence post appearing directly behind someone's head creates an unintentional “antenna” that clutters. The test I run in the field: does this line have a destination within the frame? If it terminates at or points toward the subject, it leads. If it just crosses the frame without going anywhere purposeful, it clutters. Be especially careful with horizontal lines in the middle third of the frame — a horizon or a wall running behind the subject at shoulder height is almost always a clutter element, not a leading element. Move your shooting position up or down to put that horizontal line above the head or below the waist.
Framing Within the Frame — Using Natural Borders Around Your Subject
Framing within the frame is one of the most powerful composition techniques in outdoor portrait photography, and the South Shore offers it in abundance. The idea: use elements in the environment — overhanging branches, a doorway, a gap between two trees, a rocky formation on either side — to create a natural border around the subject that draws the eye inward and adds depth to the image.
The wooden boardwalk at Hingham Harbor offers one of my favorite natural framing opportunities on the South Shore. The wooden railings and posts on either side create a rectangular structure that focuses attention on whoever stands at the far end. The parallel lines of the railing lead, and the rectangular structure frames — both techniques operating together. I've shot dozens of family and senior portraits here and the composition works almost every time because the location builds the frame for you without any effort on your part.
In wooded locations — the conservation trails in Norwell, the tree-lined paths in Duxbury, the forested edges of the North River corridor in Marshfield — overhanging branches are the most reliable framing element. Position yourself so that a branch arcs across the top of the frame and partial foliage intrudes from the sides. With a wide aperture (f/2 to f/2.8), those branches and leaves blur into soft, warm tones that border the subject without competing. The viewer's eye reads the soft foreground frame as context and moves inward toward the sharply focused subject at center.
The technical requirement for this technique: the framing element must be significantly out of focus. If the branch is as sharp as the subject, it competes for attention. If it's rendered in soft bokeh, it frames. That means getting physically close to the framing element and using a longer focal length or wider aperture to keep depth of field shallow. I typically reach for an 85mm lens at f/2 or f/2.8 when I'm deliberately using natural frames — the focal length compresses the depth of field and turns the framing element into something that borders rather than intrudes.
Negative Space — Room to Breathe and What It Does to the Mood
Negative space is the empty area around the subject — the sky, the ocean, the open field, the expanse of sand. It's the part of the frame that doesn't contain the main subject but shapes how the subject feels within the image. Used intentionally, negative space creates a sense of calm, openness, and quiet confidence. Used accidentally, it makes images feel empty and unresolved.
The South Shore is exceptionally well suited to negative space compositions because of the ocean. A person standing on the Cohasset shoreline with two-thirds of the frame given to open water and sky is a completely different portrait from that same person filling the entire frame. The first image feels expansive, reflective, and grounded in a world larger than the individual. The second feels intimate and immediate. Both are valid portrait approaches — negative space is the tool that produces the first feeling, and tight cropping produces the second. I use negative space most heavily for senior portraits along the coast: the combination of a significant life milestone and a sweeping, open Atlantic creates images that carry real emotional weight.
The key to effective negative space is that the empty area must be tonally simple. Open sky, open water, a long stretch of beach, an open conservation field — these work as negative space because they don't compete with the subject for the viewer's attention. A cluttered background filled with trees, buildings, or dense texture is not negative space, even if the subject is positioned small within the frame. The empty area needs to actually read as empty: minimal texture, low contrast, no competing elements pulling the eye away.
One practical rule I almost never break: when you give a subject negative space on one side of the frame, face them into that space rather than away from it. A subject looking toward the open area feels like they have room to exist within the frame. A subject looking away from the open area — toward the edge of the frame — creates an uncomfortable tension, as if they're about to exit the shot. Intentional tension like this can work in conceptual or editorial images, but for outdoor lifestyle portraits it almost always reads as an accidental framing error.
Putting the Tools Together — Composition in the Field
These four tools — rule of thirds, leading lines, framing within the frame, and negative space — rarely operate in isolation. The best outdoor portraits usually combine two or three of them in a single image. What looks like an instinctive, spontaneous shot is usually a rapid evaluation of all four and a decision about which combination serves that particular scene.
Here's how I think through it in real time. I arrive at a location — let's say the beach path entrance at Plymouth Long Beach. I walk the space before my client arrives. I'm looking for: lines (the path edge, the shoreline, a fence, the horizon), potential natural frames (beach grass on either side of the path, any overhanging vegetation at the access trail entrance), and potential negative space (the open sky ahead, the ocean visible to the right). By the time my client arrives, I have three or four compositions already mapped. The session becomes about executing those compositions with real people in real light, staying flexible as conditions shift.
The mistake I see most often from beginners: arriving at a location and immediately starting to shoot from eye level, straight on, subject centered. That produces technically competent images that feel visually inert. The alternative — five minutes of scouting before the subject arrives, finding the angles, identifying the leading lines, locating the natural frames — takes the same amount of time and produces images that feel considered and alive.
For clients curious about what I'm doing during the quiet moments of a portrait session — when I ask you to stand somewhere while I look around, or when I take a test shot that doesn't seem to include you — this is it. I'm reading the light, identifying the lines, planning the next composition. Those thirty seconds of quiet assessment are what make the following few minutes of shooting feel effortless and natural.
Frequently Asked Questions
Does the rule of thirds always apply in portrait photography?
No — and knowing when to break it is as important as knowing how to use it. Centered compositions work beautifully when the location has strong symmetry: a wooden dock running into the harbor, a path converging toward a vanishing point, a symmetrical archway. The rule of thirds excels when environmental context fills the surrounding frame. I use both regularly on the South Shore. The only requirement is that the choice is intentional, not accidental.
What is the difference between leading lines and lines that just clutter the shot?
A leading line moves the eye toward the subject. A cluttering line crosses the frame without directing the viewer anywhere useful. The test: does this line have a destination within the frame? A shoreline running from the corner toward the person leads. A fence post appearing directly behind the head clutters. Horizontal lines running at shoulder height through the background almost always clutter — adjust your shooting position so the horizon falls above the head or below the waist.
When should I break composition rules in portrait photography?
Break them when breaking them serves the image better than following them. The practical filter: can you explain why you made the unconventional choice? If yes, it was probably intentional and probably right. If the answer is “I didn't notice,” it was probably an accident. Spend enough time with the rules that violating them becomes a deliberate tool — then break them as often as the image requires.
How do I use negative space effectively in portrait photography?
Negative space works when it is intentional and tonally simple — open sky, open water, a stretch of beach or field. The empty area should not compete with the subject. On the South Shore, I use it most often against the ocean or a clear sky, giving the subject one third of the frame and letting the environment fill the rest. Always face the subject into the negative space rather than away from it: a subject looking toward the open area feels grounded in the frame, while a subject looking away from it feels like they're about to exit the shot.
What is framing within the frame, and how do I find natural frames outdoors?
Framing within the frame means using environmental elements — overhanging branches, a gap between two trees, a doorway or archway — to create a natural border around the subject. On the South Shore, I look for overhanging branches at beach access paths, gaps between trees at conservation trail entrances, or weathered fence gates. The framing element should be significantly out of focus — use a wide aperture (f/2 to f/2.8) and a longer focal length so the natural frame renders as soft context rather than competing detail.
PRO TIP
“Scout the location before your subject arrives. Five minutes of walking the space — finding the lines, identifying the natural frames, noting where the light falls — is worth more than an extra lens in your bag. By the time the session starts, the composition decisions are mostly already made.”
See These Composition Principles in Action
If you're curious how rule of thirds, leading lines, and natural framing translate into real South Shore portraits, reach out to discuss a session across Hingham, Scituate, Norwell, Duxbury, Plymouth, and beyond.
PILLAR GUIDE
The Complete Guide to Photography Basics on the South Shore
This post covers composition fundamentals as one spoke of a larger guide. For the full overview — exposure, light quality, focus, gear for beginners, and more from the perspective of a working South Shore photographer — read the complete photography basics pillar guide.
Full beginner photography fundamentals guide →
ABOUT THE AUTHOR
Chris McCarthy is a portrait photographer based in Rockland, MA who has been photographing the South Shore full-time since opening his studio in 2014 — more than a decade of outdoor and lifestyle portrait work across the region. He specializes in headshots, senior portraits, branding, family, and maternity photography — shooting at his studio at 83 E Water Street and on-location throughout southeastern Massachusetts at places like World's End, Scituate Harbor, Duxbury Beach, and the North River conservation land in Norwell.
Continue learning the fundamentals
Each spoke of the basics guide goes deeper on one technical foundation. Read whichever one you need next.
LIGHT DIRECTION
Natural Light Direction for Portraits
Front, side, back, top — how each direction shapes the face and what to choose when.
LENS CHOICE
Focal Length Basics for Portraits
Why 85mm flatters faces and 35mm tells a wider story — choosing focal length per shot.
BACKGROUNDS
Finding Clean Backgrounds on the South Shore
Where to look — and what to avoid — when scouting clean portrait backgrounds locally.
COLOR
White Balance & Color Temperature
Warm vs cool, golden hour vs blue hour, and how to keep skin tones honest in mixed light.
POSING
Basic Posing for Non-Models
How to direct everyday people so they look comfortable and natural — the language that works.
More from the Blog
SERVICE
Senior Portraits — South Shore
Composition put to work in real senior sessions across the South Shore →
PHOTOGRAPHY BASICS
The Exposure Triangle Explained for Beginners
Aperture, shutter speed, and ISO — how the three interact and how to use them to take real control of your camera.
PHOTOGRAPHY BASICS
How to Get a Blurry Background (Bokeh) in Portrait Photography
The settings, distances, and lens choices that create that creamy background blur portrait photographers love.