PHOTOGRAPHY BASICS · LIGHT
Natural Light Direction for Portrait Photography
South Shore Photography, based in Rockland, MA, serves clients across Hingham, Scituate, Norwell, Duxbury, Marshfield, Cohasset, Hanover, Weymouth, and Plymouth. Photographer Chris McCarthy works exclusively with natural light outdoors — no strobes, no studio, no light modifiers beyond an occasional reflector. Here, he breaks down everything that matters about light direction and how to use it in the field.
When people ask me what separates a technically competent portrait from a genuinely great one, my answer is almost always the same: light direction. Not the camera body, not the lens, not even the location — direction. You can stand at one of the most beautiful spots on the South Shore with a thousand-dollar lens and completely blow the session because you positioned your subject facing the wrong way. I've done it myself, early in my career. I've also watched complete beginners produce stunning portraits on their first outdoor shoot because they stumbled into perfect side light at the right moment. Understanding what is actually happening in those moments — and learning to create them deliberately — is the single biggest step forward you can take as a photographer or as a client who wants to understand why their portraits look the way they do.
Why Light Direction Changes Everything
Before we get into specific directions, it helps to understand what light direction actually does to a face. Human faces are three-dimensional — they have depth, contour, and texture. Light direction determines how much of that three-dimensionality shows up in a two-dimensional photograph. Light from directly in front flattens a face. Light from the side reveals its shape. Light from behind creates separation and glow. Each of these is a creative tool, not a hierarchy — the right choice depends on what story you want to tell and what the subject's face actually looks like.
There is also the quality of the light to consider — hard versus soft, specular versus diffused — but that is a separate variable from direction. A soft light source can come from any direction. A hard light source can too. In this post I am focused specifically on direction, because it is the variable beginners most often overlook and the one that produces the most dramatic difference when you learn to control it.
I work outdoors year-round on the South Shore — beaches, meadows, conservation land, harbor areas — and I am constantly reading the light before I place a subject anywhere. Where is the sun? What angle is it at? What is open sky and what is blocked? Those questions get answered before I pick a specific spot to shoot from. Let me walk you through the four main directions you will encounter and how I think about each one.
Front Light: Even, Accessible, and Deceptively Limiting
Front light is what most people reach for instinctively. You put the sun behind you, it falls directly onto your subject's face, everything is evenly lit, and exposure is straightforward. This is the setup camera auto modes were designed for. And it works — up to a point.
The problem with front light is that it flattens the face. When light is coming from exactly the same angle as the camera, shadows fall straight behind the subject and never appear on the face itself. The nose casts no shadow. The cheekbones cast no shadow. The result is technically exposed but dimensionally flat — faces look slightly wider, features less defined, and the whole image tends toward the snapshot quality that portrait photographers actively work to avoid.
That said, front light has legitimate uses. Soft front light — on an overcast day or in open shade facing a bright sky — can be clean, contemporary, and flattering for the right faces. Some environmental portrait styles, where the background context matters as much as the subject, benefit from even illumination across the whole frame. At the World's End meadows in Hingham, I will sometimes use a broad overcast sky as a front light source to get both the sweeping landscape and the faces consistently exposed without hot spots or competing shadows.
The worst version of front light is harsh midday sun directly behind the photographer. This combines flat illumination with squinting, blown skin tones, and hard shadows on anything vertical in the frame. It is the combination I work hardest to avoid when I am planning session timing.
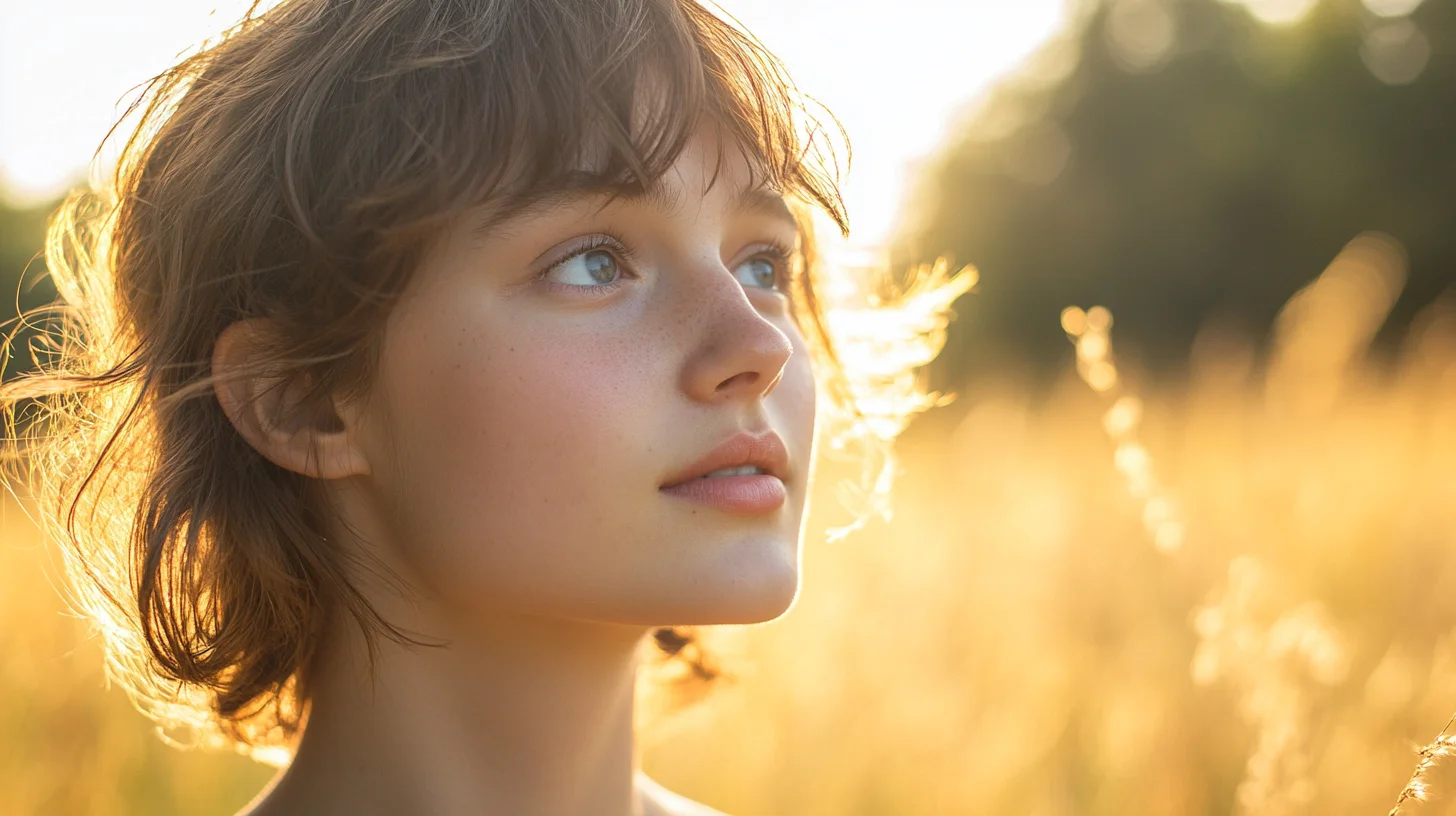
Side Light: The Portrait Photographer's Primary Tool
If I had to choose one light direction for the rest of my career, it would be side light — specifically, soft side light arriving at a low angle. This is the light that makes faces look most like themselves: dimensional, contoured, real. When light comes from the side at roughly 45 to 90 degrees, it creates a gradient of illumination across the face that defines the nose, reveals cheekbone structure, and adds depth to the eyes that no amount of post-processing can fake. Side light is what makes a face look sculpted rather than printed.
At World's End in Hingham, the hour before sunset on a clear afternoon gives you side light hitting the open meadow from the west at a low, warm angle. Position a subject perpendicular to that light — standing sideways to the sun — and you get the classic portrait quality: one side fully lit, the other in soft graduated shadow, a contour map of every feature. This is why portrait photographers are so obsessed with golden hour. It is not only the warm color temperature. It is the angle. That low arc of the setting sun is what transforms ordinary flat land into a natural side-light studio.
The degree of side-ness matters. At roughly 45 degrees off center — sometimes called Rembrandt lighting after the Dutch master's painted portraits — you get dramatic shadows without losing too much detail in the shadow side. At 90 degrees, with light coming directly from one side, the shadow half of the face can go very dark unless you have something bouncing light back in from the other side. For most outdoor portrait situations on the South Shore, 45 to 70 degrees from center gives the most consistently flattering results without requiring a reflector.
One of my favorite side-light locations is the open conservation fields in Norwell. In late afternoon, the tree line along one edge of the field blocks direct sun from above while the open western sky throws clean, warm horizontal light across the grass. A subject standing in that field, with the light raking in from the side, looks genuinely three-dimensional in a way that is difficult to manufacture artificially. The same effect happens at the Scituate Lighthouse at golden hour — the lighthouse itself creates useful shadow on one side while the open harbor sky provides fill from the other.
Back Light: Drama, Glow, and the Exposure Decision
Back light — placing your subject between you and the light source so you are shooting directly into the light — is the most dramatic and the most technically demanding of the four directions. When it works, it produces images that are immediately recognizable: glowing hair edges, luminous skin separation from the background, a warmth that looks almost cinematic. When it fails, it produces muddy silhouettes and overexposed backgrounds with a dark, underlit subject lost in the middle.
The key to making back light work outdoors is understanding that you have to choose what to expose for. Your camera cannot simultaneously hold detail in a bright backlit sky and in a subject whose face is in shadow — you have to make a decision. Most of the time, I expose for the subject's face and allow the background to overexpose slightly. This preserves skin tone and facial detail while creating that signature bright, airy background. The alternative — exposing for the background — produces a silhouette, which is its own valid creative choice but requires intentional commitment before you press the shutter.
At Duxbury Beach, back light at golden hour is one of the most beautiful lighting situations I encounter on the South Shore. The setting sun lights up the dune grass from behind, creating a rim of warm gold around subjects standing in the dunes. Faces in this situation need either a reflector or a slight fill exposure correction to avoid going too dark, but when the balance is right, the images have a quality I cannot replicate any other way. The light wraps around hair and clothing edges in a way that no front or side light can.
Practical note: when shooting into back light, watch for lens flare. Depending on your lens and the sun angle, you can get beautiful organic flare that adds to the mood — or distracting geometric artifacts that ruin an otherwise strong image. I shade my lens with my hand when I want clean output and deliberately allow flare when I want a more stylized, editorial feel. The point is to decide intentionally rather than let it happen by accident.
Overhead Light: Why Midday Sun Is the Enemy of Portraits
Between roughly 10 AM and 3 PM in summer — and with a narrower window in fall and winter as the sun's arc lowers — the sun is high enough to function as an overhead light source. This is, without qualification, the least flattering direction for outdoor portrait photography. When light falls from directly above, it lands on the top of the forehead and nose but not on the eyes, cheeks, or jaw. The result is deep shadows in the eye sockets — the raccoon effect — and harsh highlights on the forehead and nose with muddy pools of shadow below the features.
This is why golden hour exists so prominently in portrait photographer vocabulary. It is not only the warm color temperature, though that genuinely matters. It is the angle. An hour before sunset, the sun sits at perhaps 10 to 20 degrees above the horizon, functioning as a dramatic side or back light depending on how you orient your subject. That low angle is the real prize portrait photographers are chasing when they book golden hour sessions.
This does not mean portraiture at midday is impossible. It means you need to work around the overhead source. The solution is almost always open shade: move your subject out of direct sunlight and into a shaded area where the overhead sun is blocked. Under a tree, in the shadow of a building, beneath a covered walkway — in any of these positions, the direct overhead source is eliminated and the subject is now lit by the broader open sky, which behaves as a large, soft, slightly directional light source. At Scituate Lighthouse, even at noon, I can find excellent light on the shaded ocean side of the tower, where the structure blocks direct overhead sun and the open Atlantic sky provides clean, even illumination across the subject's face.
Open Shade: The Consistent, Forgiving Option
Open shade deserves its own section because it is the most reliable, consistently beautiful natural light available to outdoor portrait photographers — and it is almost always accessible even when golden hour is not. Open shade means your subject is shielded from direct sunlight but positioned facing an open, bright sky. That sky — enormous and diffused by atmosphere — becomes the effective light source, producing soft, even illumination with gentle, flattering gradients across the face.
The word “open” in open shade is doing real work. A subject standing deep under a dense tree canopy is in shade, but not open shade — the sky is blocked from multiple angles, producing muddy, directionless light. A subject standing at the edge of a tree line, in the shadow cast by the trees but facing an unobstructed open sky, is in true open shade. The difference in image quality between these two positions is significant and immediately visible.
I use open shade constantly on the South Shore for clients who do not have evening availability or for sessions scheduled outside the golden hour window. The north-facing shaded walls of buildings in Hingham harbor create beautiful open shade with reflected sky light bouncing off the water. The shaded side of the dunes at Duxbury Beach, facing north toward the bay, gives you the same clean quality. If you learn to identify open shade, you can produce excellent portraits at almost any time of day on any location the South Shore offers.
Open shade is also my first recommendation for anyone learning portrait photography before they have mastered the complexity of golden hour exposure. In open shade, exposure is relatively predictable, the light does not shift second by second the way a setting sun does, and you have the mental bandwidth to focus on composition and genuine connection with your subject rather than chasing a moving light source. Once you understand what good light looks like in open shade, you will have the visual vocabulary to recognize and pursue better light everywhere else.
Frequently Asked Questions
What's the worst light for portraits?
Overhead midday sun. When the sun is directly above your subject, it creates harsh shadows in the eye sockets, under the nose, and beneath the chin — the raccoon shadow effect — that emphasizes texture and wrinkles while washing out skin tone overall. If you must shoot at midday, the fix is consistent: find open shade where direct overhead sun is blocked but open sky still provides soft, directional illumination.
Can I shoot good portraits at noon?
Yes, but not in direct midday sun. Find open shade — a spot where your subject is shielded from direct overhead sunlight but has an open view of bright sky. Under a large tree canopy edge, in the shadow of a building that faces open sky, or anywhere that blocks direct sun while letting the diffused sky illuminate the subject. On overcast days, noon portraits are genuinely manageable because cloud cover diffuses the entire sky and eliminates the harsh angle problem entirely. The rule is simply: never place a subject under unobstructed midday sun.
How do I find side light on an overcast day?
On overcast days, the whole sky becomes your light source — soft and flattering but flat and directionless. To add dimension, look for environmental elements that block or redirect light on one side: position your subject near a building wall or tree line so one side of their face is slightly shielded, or place them at the edge of shade where the transition between shade and open sky creates a subtle gradient across their face. A large white reflector on one side adds further dimension. It will not replicate the drama of golden hour side light, but it gives you the dimensional quality that pure flat overcast light lacks.
PRO TIP
“Before you pick up the camera at any outdoor location, spend sixty seconds just looking at where the light is coming from and what it is doing to the surfaces around you. That habit — reading the light before framing the shot — will improve your portraits faster than any gear upgrade ever could.”
Work With a Photographer Who Reads the Light
Every South Shore Photography session is planned around light direction — timing, location, and positioning chosen to make the most of what the South Shore has to offer at any given time of year.
PILLAR GUIDE
The Complete Guide to Photography Basics on the South Shore
This post is part of the photography basics series. For the full overview — exposure, aperture, shutter speed, ISO, composition, and how all the fundamentals work together when shooting outdoors on the South Shore — read the complete pillar guide.
Read the photography fundamentals pillar guide →
ABOUT THE AUTHOR
Chris McCarthy is a portrait photographer based in Rockland, MA who has been photographing the South Shore full-time since opening his studio in 2014 — more than a decade of outdoor and lifestyle portrait work across the region. He specializes in headshots, senior portraits, branding, family, and maternity photography — shooting at his studio at 83 E Water Street and on-location throughout southeastern Massachusetts at places like World's End, Scituate Harbor, Duxbury Beach, and the North River conservation land in Norwell.
Continue learning the fundamentals
Each spoke of the basics guide goes deeper on one technical foundation. Read whichever one you need next.
COMPOSITION
Composition Fundamentals for Portraits
Rule of thirds, leading lines, framing — composition that makes a portrait feel intentional.
LENS CHOICE
Focal Length Basics for Portraits
Why 85mm flatters faces and 35mm tells a wider story — choosing focal length per shot.
BACKGROUNDS
Finding Clean Backgrounds on the South Shore
Where to look — and what to avoid — when scouting clean portrait backgrounds locally.
COLOR
White Balance & Color Temperature
Warm vs cool, golden hour vs blue hour, and how to keep skin tones honest in mixed light.
POSING
Basic Posing for Non-Models
How to direct everyday people so they look comfortable and natural — the language that works.
More from the Blog
ON LOCATION
South Shore Beach Photography
Where natural-light direction matters most — golden-hour beach sessions →
SERVICE
Family Portraits — South Shore
Natural-light family sessions across the South Shore →
PHOTOGRAPHY BASICS
The Exposure Triangle Explained for Beginners
Aperture, shutter speed, and ISO — how the three interact and how to balance them for better outdoor portraits on the South Shore.
PHOTOGRAPHY BASICS
Common Beginner Photography Questions Answered
The most frequently asked photography questions from South Shore beginners, answered plainly and without jargon.